 |
| A lovely lady with a pancake head (see below) |
Heads and hands are of profound importance when creating a figure. Interpretation of expression and mood comes from reading facial features and hand gestures. Body position is also important, but the purpose of a particular pose can be easily overridden by a strong facial expression or hand gesture.
I create figures with animal heads, so I don't rely as much on facial expressions. Animals and birds don't have the same type of expressions as humans (although they can be sculpted to approximate this) so I focus on creating a head that is a realistic shape and size There are a few ways to do this.
 |
| Cat head pattern with needle-sculpted features |
The first method to creating a head is to cut out oval pieces of fabric, sew them together, stuff with fiberfill and obtain a realistic head shape. Fine tuning can be created with needle-sculpting. Eyes and markings can be sewn or painted on. For all the heads that I show below as examples, I'm using knit fabrics. Knits will give smooth surfaces when stuffed and are perfect for needle-sculpting. Old t-shirts are great for practicing techniques - be prepared to make a lot of heads!
 |
| Pancake head without needlesculpted features |
The head shown above is a 'pancake' head. Two circles of fabric are sewn and stuffed, then the features are needle sculpted or painted. The face is then sewn onto another pancake with one end left open to receive the neck. The resulting head looks pretty horrible in it's semi-completed state, but when covered with hair, you'd never notice the large skull bump in back. As an example, look at the figure at the opening of this post. Of course, you can alter patterns to suit your needs, so your heads may very easily look better than mine!
 |
| side view of basic head |
 |
| back view of basic head |
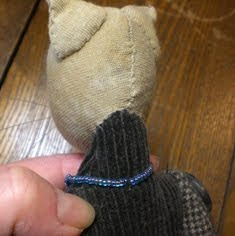
The head shown above is similar to the pancake, but it has been stuffed much more (til it's head shaped) and a seam is left to run down the center of the face. Needle-sculpting has created and accentuated some features, with others painted on. The bottom is left open to recieve the neck stem. The other option with this head is to have the seam around the head (cheeks, chin, forehead) which would leave a smooth face (as with the pancake head). If you go this route, you can either cut a hole in the back to recieve the neck (best), or sew the head directly onto the neck (not as stable). Although you would think the neck join would look sloppy, it doesn't (see below).
 |
| Our friend the cat showing the head/neck join. |
The partial head shown below shows a technique to give some dimensionality to a face without creating a lot of pattern pieces. A piece of fabric is first folded to create eyelids, then folded lengthwise and sewn with a nose bump. This could be used as the front of a pancake head or just by itself. It would probably be best to use a smaller fold for the eyelids and knit fabrics for stretch. Beads or buttons can be used as eyes.
 |
| Fold made for eyes/eyelids |
|
Folded in half, sewn with nose 'bump' |
 |
| turned right side out with a dimensional face |
The last option is to have lots of pattern pieces and sew them together - I just don't do this. I don't have the time, patience or inclination. Still, you should try it once to see if it works for you.
The method I use most is much more organic and multi-step. I build up the head, layer by layer to create a solid, three-dimensional shape (see the previous post for a bird example). I find this is the simplest way to create the look of muscle and bone that seems more appropriate to animal heads. It is also very easy to make a different head shape for 10 different figures in one sitting and not have to work with multiple pattern pieces and stuffing. Although it may seem time consuming to do this, it's not.
 |
| Head/neck join for a wool-headed figure. |
Once the head is complete, it is usually sewn onto the neck. It is very important to have a firmly stuffed neck and shoulder area so that your figure doesn't slouch or show 'fatigue' in the future! If your figure is large, you can use a wire armature or wooden rods to stabilize the neck. I find however, that if your figure's body and neck are properly (
firmly) stuffed, additional supports are not necessary. Find a head position you like, pin
very tightly and sew around the neck in two complete circuits using button or upholstery thread; don't skimp and use puny thread! Any evidence of flopping or sagging means you have to re-pin (catching loose fabric in a fold) and re-sew. Although this is the most common method of attaching heads, it does have an obvious downside - no movement is possible. I will discuss alternatives and how they work (or not) in future posts.
Now that you have some options, be brave, try some heads!


No comments:
Post a Comment