I'm using a green silk scrap and although it is quite sturdy, it is on the bias, so I decided to back it with a lightweight cotton. The added layer also adds a bit of padding and prevents the outlines of threads in the back from showing on the front. I chalk an outline of the garment sections onto the backing, then baste the layers together.
The basting stitches are barely visible from the front. This gives me an idea of the edges of the garment when I'm placing motifs - I don't want to get too close and sew through something later. Chalk marks indicate stems and leaves to be stitched in perle cotton. I do not use a hoop, I just hold the cloth in my hands and don't pull the thread too tight. This takes practice, but is easier and faster for me.
 I decided to add some blue french knots for interest. You can see that
the chalk comes off easily. In fact, I have a hard time keeping it on
through the stitching process.
Flowers look best when randomly placed throughout a design. It is important to point out the randomness is not the same as evenness. Most people want to distribute flowers evenly, but this never looks natural. To simulate randomness, I get a handful of buttons, close my eyes, and toss them onto the fabric.

I mark the position of each button in chalk. Some flowers will be placed over greenery I've already stitched, but that's fine.

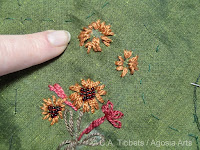
After stitching the tubular flowers, I repeat the button toss for placement of some daisy-type flowers. Again, some of these flowers might be placed on top of previous stitching.
 The daisys have beaded centers and I decided to complete most of that beadwork now, before the garment is completed. I avoid beadwork in flowers that lie close to seamlines because the beads may interfere with my sewing machine presser foot. These flowers will be completed after the garment is sewn.
 I lined the garment sections in blue silk. Shown here is a front section sewn and turned, but not yet pressed. The back section has been sewn, but not yet turned. You can see the usual meshwork of threads and knots, but this will never be visible and will be kept safe from wear by the blue silk lining.


Would you like to share some of the pictures that can reveal the present human psyche?
ReplyDelete