Although this blog is no longer active (Agosia Arts still is!), it remains a useful repository for some of my early musings. My goals were to : 1) provide a peek behind the scenes at how my work is produced; 2) document my problem solving process; and 3) encourage others to try new things. If you have questions, email me at catibbets@agosiaarts.com. Thank you for visiting!

Search This Blog

September 24, 2010

From the top

A lovely lady with a pancake head (see below)
Heads and hands are of profound importance when creating a figure.  Interpretation of expression and mood comes from reading facial features and hand gestures. Body position is also important, but the purpose of a particular pose can be easily overridden by a strong facial expression or hand gesture. 

I create figures with animal heads, so I don't rely as much on facial expressions.  Animals and birds don't have the same type of expressions as humans (although they can be sculpted to approximate this) so I focus on creating a head that is a realistic shape and size  There are a few ways to do this.

Cat head pattern with needle-sculpted features

The first method to creating a head is to cut out oval pieces of fabric, sew them together, stuff with fiberfill and obtain a realistic head shape.  Fine tuning can be created with needle-sculpting.  Eyes and markings can be sewn or painted on.  For all the heads that I show below as examples, I'm using knit fabrics.  Knits will give smooth surfaces when stuffed and are perfect for needle-sculpting.  Old t-shirts are great for practicing techniques - be prepared to make a lot of heads!

Pancake head without needlesculpted features
The head shown above is a 'pancake' head.  Two circles of fabric are sewn and stuffed, then the features are needle sculpted or painted.  The face is then sewn onto another pancake with one end left open to receive the neck.  The resulting head looks pretty horrible in it's semi-completed state, but when covered with hair, you'd never notice the large skull bump in back.  As an example, look at the figure at the opening of this post.  Of course, you can alter patterns to suit your needs, so your heads may very easily look better than mine!

side view of basic head
back view of basic head


The head shown above is similar to the pancake, but it has been stuffed much more (til it's head shaped) and a seam is left to run down the center of the face.  Needle-sculpting has created and accentuated some features, with others painted on.  The bottom is left open to recieve the neck stem.  The other option with this head is to have the seam around the head (cheeks, chin, forehead) which would leave a smooth face (as with the pancake head).  If you go this route, you can either cut a hole in the back to recieve the neck (best), or sew the head directly onto the neck (not as stable).  Although you would think the neck join would look sloppy, it doesn't (see below).

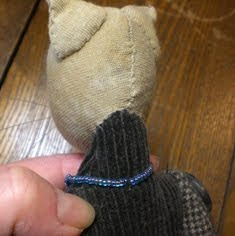
Our friend the cat showing the head/neck join.

The partial head shown below shows a technique to give some dimensionality to a face without creating a lot of pattern pieces. A piece of fabric is first folded to create eyelids, then folded lengthwise and sewn with a nose bump. This could be used as the front of a pancake head or just by itself.  It would probably be best to use a smaller fold for the eyelids and knit fabrics for stretch.  Beads or buttons can be used as eyes.

Fold made for eyes/eyelids

Folded in half, sewn with nose 'bump'

turned right side out with a dimensional face

The last option is to have lots of pattern pieces and sew them together - I just don't do this.  I don't have the time, patience or inclination.  Still, you should try it once to see if it works for you.

The method I use most is much more organic and multi-step. I build up the head, layer by layer to create a solid, three-dimensional shape (see the previous post for a bird example).  I find this is the simplest way to create the look of muscle and bone that seems more appropriate to animal heads.  It is also very easy to make a different head shape for 10 different figures in one sitting and not have to work with multiple pattern pieces and stuffing.  Although it may seem time consuming to do this, it's not. 

Head/neck join for a wool-headed figure.
Once the head is complete, it is usually sewn onto the neck.  It is very important to have a firmly stuffed neck and shoulder area so that your figure doesn't slouch or show 'fatigue' in the future!  If your figure is large, you can use a wire armature or wooden rods to stabilize the neck.  I find however, that if your figure's body and neck are properly (firmly) stuffed, additional supports are not necessary.  Find a head position you like, pin very tightly and sew around the neck in two complete circuits using button or upholstery thread; don't skimp and use puny thread!  Any evidence of flopping or sagging means you have to re-pin (catching loose fabric in a fold) and re-sew.  Although this is the most common method of attaching heads, it does have an obvious downside - no movement is possible.  I will discuss alternatives and how they work (or not) in future posts.

Now that you have some options, be brave, try some heads!


September 18, 2010

A bird's eye view

Most of the heads I make are animal heads.  Mammals are pretty straightforward, but the birds get a lot more attention.  I guess it's the beak.  Keep in mind that the process I describe below is idiosyncratic.  No-one taught me this, I experimented (with many failures!) until I found something that works for me.  I strongly suggest you do the same.  Use what you have to make the process your very own. 

The head I'm going to describe below is a swan head.  The first step is to have a good picture of the head for reference.  I prefer using drawings from bird identification books because the artist has skillfully accentuated the features that make the species unique.  It's like looking at caricatures - they all have eyes, noses, mouths, but the shapes have been exaggerated and you can instantly recognize each indiviual.


Sketch of a Tundra Swan
Sketch showing internal structure of head


Swans have large broad beaks and distinctive cheeks.  When making a bird, you can't just stick on a beak.  Well, at least I can't (not for lack of trying!).  So, my process begins with the beak.  Notice in the sketch above that the beak structure is embedded far inside the head.  It won't ever fall out or become loose.


Foam for top and bottom of beak
Trimming foam into a realistic shape


Beaks are made from two pieces of closed cell foam carved into shape.  I've tried using styrofoam and it doesn't work for a variety of reasons.  The main one is that you can easily squish a dent into the beak which won't ever come out - a very distressing look.  Closed cell foam is flexible, easy to cut, and leather binds well to it.  I buy it in large rolls from camping supply stores. 


Apply two coats of cemet to wrong side of leather
Apply cement to top and bottom of foam

I select a leather scrap that has the correct color and texture and coat it well with rubber cement.  Coat the foam with cement also.  Usually I'm coating the suede side of the leather, so it will require another coat of cement for good adhesion.  Allow both items to 'dry'.


Trim excess leather, leaving about 1/4" for wrapping
Cut notches and wrap leather snugly around edges

Carefully stretch and place the leather over the foam.  It will stick immediately even though neither side feels sticky.  You can reposition a little bit, but don't try more than twice- better to start over.  Trim the leather to size, clip excess around curves and form leather around the beak.

Finished beak with top and bottom glued together

Apply rubber cement to both inside surfaces of the beak, allow to dry and then cement the top and bottom together.  Everything should stick well.  If not, start over.  You many notice that the beak is huge.  Two things to think about.  First, a lot of the beak will be inside the head.  Second, I can never quite get the size right.  But, because I'm actually making more of a caricature than a perfect replica, the swan will look just fine when it's finished. The eye and brain work things out in my favor.


Applying glue to attach wool strips to beak
Layers of wool simulate flesh and bone

The next step begins the head construction. The basic method is to use layers of wool felt (I use old felted sweaters from Goodwill); do not use synthetic felts!  Wool felt is sturdy, firm, behaves in a predictable manner and is wonderful to sew.  A strip of felt is wrapped and glued over the beak creating a wool ball.  Over this ball, I layer strips and shapes to build up a head until it is slightly smaller than I need.  The final layers of fabric (usually wool, but in this case corduroy) will be sewn on to approximate the final colors of the animal.  Glass beads are used for eyes and can be sewn into the felt.  If necessary, needlesculpting can be used to add details.  


Outer fabric pinned over wool and ready for hand stitching
Completed head - it looks just like a Tundra Swan!

September 1, 2010

A Show of Hands

Work in progress with wired hands
Hands and their gestures can add a lot of nuance to a figure. For a variety of reasons, many people have a fear of making hands.  Fingers are small body parts to begin with, and sewing something extra small can be a daunting task.  Stuffing something so tiny can pose problems.  Creating realistic gestures can be tricky.  Never fear, you have options.


The mitten hand is a good general purpose hand for a beginner.  There are few small parts (only the thumb, really) and it's pretty easy to turn the hand right side out.  "The mitten" doesn't offer much in the way of gesture, but by altering needlesculpting tension, these hands can be open or closed and can be sewn into a variety of positions when completed.


The nice thing about this hand is the process of stitching finger grooves creates a bit of a curl to the fingers- very realistic.  Notice in the mitten hands shown above that they have been overstuffed (they look like pudgy baby hands).  This is a problem beginners often have - if it's hollow, stuff it.  Actually, the best mitten hands have almost zero stuffing, as seen below

A reasonably good mitten hand

The little cat doll above has typical mitten hands.  The palms are pretty flat, the hand curls a bit and it has clearly defined 'fingers'.  The hands are stuffed lightly and tucked into the end of the arm.  I use a round of backstitches to keep the hand in place.  Because I use wools and other heavy fabrics, the stitches are nearly invisible.


The hand that I use the most is a realistic hand with all five fingers.  I used to be afraid of these (turning those tiny fingers!), but the key is using knit fabrics.  Knits are a bit trickier to sew (use the appropriate needle in your machine), but the end result is sooooo much easier to work with.  Another big help is creating a pattern with the fingers spread wide; this will give you some (but not much!) seam allowance and prevent blow-outs when turning fingers.  When stitching, don't use a shorter stitch length; this will decrease stretch and cause more problems, not fewer.


Unshaped hands with chenile stems

The hands shown above have been turned right side out and then 'stuffed' with chenille stems.  It is a good idea to turn the fingertip end of the stem into a tiny loop - otherwise you or a customer may get poked. Generally the hands won't require any additional stuffing.  For extra support, sometimes I insert a narrow strip of very stiff interfacing (the type used in baseball cap bills) into the wrist. This prevents the limp wrist phenomenon that can occur if your figure is moved and posed a lot.  Not a problem if the figure just sits around with one pose.
Hands after shaping

The photo above shows two hands in which the fingers have been bent into more realistic poses.  The left hand has been curved just a bit to approximate the normal appearance of a hand at rest (glance at your hand, it takes effort to open the fingers flat).  The right hand has been bent into a pointing pose. Although the fingers look a little too long and the joints are not as pointy as they should be, rest assured that on a figure, they look fine.  There is something about the human brain that interprets not so perfect body parts on artwork as looking realistic.  This is why Barbie (who's proportions are way out of whack), looks fine to most of us. 

The one downside of using wires in hands is that the hands can get bent out of shape during shipping or movement.  It is fairly easy to repose fingers, but sometimes I get gallery owners going crazy with the fingers. 

Work in progress with wired hands (see 1st photo)

So try some hands.  Start by making a pattern.  Trace three hands (an extra for mistakes) onto t-shirt fabric (the hand should be perpendicular to the grainline), then sew using 12 stitches to the inch (don't hand sew these seams, it just won't work).  Turn right side out (go slowly and think happy thoughts!).  Insert chenile stems. 

One last thing.  I'm going a bit backwards here.  The body, arms and legs should be made first, then the head and hands last.  The reason for doing this is that there is a ratio of body part sizes the eye expects to see.  If you make the head and hands first (which most people want to do), your body rarely comes out the right size.  Something to think about.  If you're just practicing, start making those hands!  Practice makes perfect.